– Original date: 2019-03-09
– Labels: Camper, Travel
### Content (HTML)
“`html
Greetings and Woofs,
Last weekend I made my dreams a reality. I put a down payment on a 1963 Shasta camper. May I present, Charlie, my home sweet home on wheels.

I waited to present the news for a couple of reasons, the main one being that it is closer to Christmas and this was my present to me, but also, I was not 100% sure how people were going to react to the news, and I did not want anyone to spoil my happiness about it.
Charlie needs some love for sure, but for $2,000 and some minor repairs that aren’t bad. She’s going to need some paint, some Bondo and for me, I’ll be remodeling the inside a bit to create more storage and better appeal to my lifestyle.
Exterior:
Let’s start with the outside. She will need to be sanded down, resealed on the roof and around the windows just as a precaution since the owner did it about a year ago. In the front by the hitch, there is a small hole – he said it wasn’t a bullet hole, but that’s about the size. It also came from the inside outward rather than the other way around.
I’m not keeping the current paint scheme so she will get a lovely new paint job.
I also want to create a better door for her. Right now, she has a “lock” that is nothing more than a padlock. Could you imagine your home only having a latch? I am going to build a new door with a stained glass window, a proper lock, and on the inside, I am going to add extra security. No one will be able to break in while I’m asleep!
Interior:
The inside is where the fun begins, as I plan to remodel 85% of it. I will keep most of the same layout but will be adding extra storage and functionality.

Bedroom:
First of all, all three walls need the panel stripped because of water damage. From there, I will see if the frame is rotten and if it replaces that, add new insulation and paneling as well as reseal the windows. Then I am going to build a bench with a lid for my mattress to rest. It will have totes to stash things like food, clothing, or whatever I need to store. I’m also going to build a shelf that runs across the top of the window. I am also going to have a tension rod to hang a curtain for privacy.
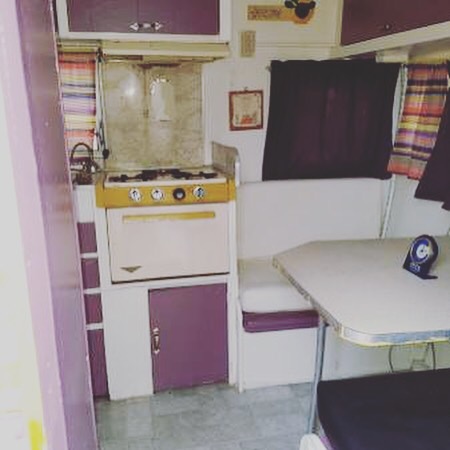
Kitchen:
I will be removing the stove. The burners work, but the oven needs apart, and I am not interested in fixing it. I can put a fridge/freezer combo in its place and put a hot plate and convection or toaster oven on the board. Speaking of the counter, I’m going to need to rebuild it if I take out the stove. I’ll be adding a backsplash, and some of those lovely purple drawers (they won’t be purple after I paint them) need reinforcement, but that’s relatively easy.

There is a fridge in the camper, but it runs with argon gas and propane, and the current owner says it never got cold enough for him to feel comfortable storing more than drinks, so he shut it off. So I will be removing that and creating more storage in its place.

I will also be removing all the hardware and refinishing it. As for the equipment in other parts of the camper – I want it to be uniform so I will be making some changes there.
Living room:
This zone needs new panels, just like the bedroom. I’m also going to build an entertainment center/ workstation for my computer against the wall with the front door, so that means tearing out the bench. It does cover the battery, so I’ll have to build around that.
Now, this is where extra storage comes into play. The bench on the opposite side (along with the same wall as the kitchen) does not have anything under it. I am going to put hinges on the lid and create storage there. On one side, I will have Achilles litter box (with a door flap for him to access it), and on the other, it will house a porta-potty for when I’m boon-docking or late at night when I don’t want to travel to the campground restrooms.

I am so excited for this next chapter.
With love and paw prints,
Essie and Willow
“`
—